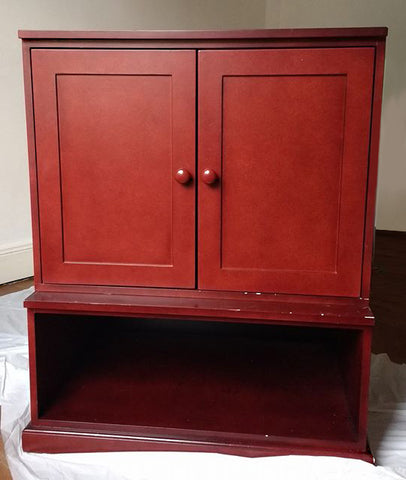
This cabinet has seen parts of the world that I haven't! It was shipped back to Ireland by a couple who had lived in Indonesia for a few years. This is a well made, solid and very heavy piece of furniture in a kind of cherrywood finish.
This one had me a bit stumped, it appeared to be a sort of laminate wood, but did not behave like one. With the first coat of undercoat there was a lot of bleed through - something that would never happen with a laminate. This would be an issue normally found with mahogany, teak and knotty pine - any dark stained or raw wood with a naturally dark finish. It is the oils in the wood that seeps through the finish causing a yellowing effect. Never fear, with furniture painting you can often run into surprises - experience makes you better equipped to spot a bleeder from a line-up, not this time! I had difficulty getting the undercoat to stick properly and so needed to spend a lot of time prepping this one. Fail to prepare, prepare to fail.
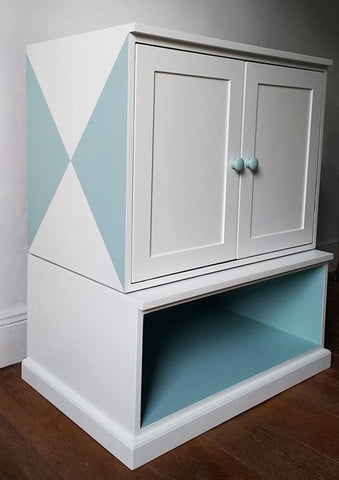
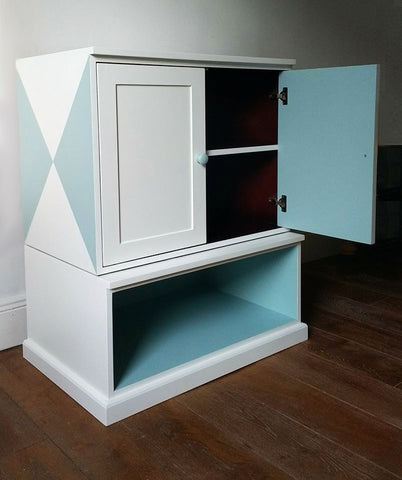
Once the bleed through had been sorted, it was time to do a base coat in white. I had been looking at the B&Q range of paints and wanted to give them a try so chose Antique White & a gorgeous soft teal in an eggshell finish for the geometric colour pops. I found this paint surprisingly easy to use, gave a lovely smooth finish and with its low price point of €13 per tin, it is an ideal paint for someone starting out with furniture painting and not looking to spend a fortune.
Another coat of white, a couple of days to cure, and the piece was ready for its bold new look. If planning to do this effect, it is important to let the piece fully cure from its base colour. Curing can take from a couple of days to a week, so it is important to check the manufacturers guidelines. If the paint is not fully cured beforehand, you risk pulling off your new paint job with the tape when creating geometric finishes such as these.
Using masking tape to create this effect, I lined marked out the areas to be painted blue. It is important to use a good quality one designed for this purpose. Sure, any old masking tape will do - wrong! To get precision lines and avoid ruining the piece you've worked so hard on, it is important to use a low tack tape such as Frogtape (available in all good hardwares such as Woodies) or Fleetwood do a brilliant Low Tack Washi Tape - available to buy on Shabby.ie . There is nothing more disheartening than finishing a piece, pulling off the tape and taking more paint with it! Always remove the tape immediately after painting and before the paint has dried - again this keeps the lines sharp and avoids pulling and damaging the paint underneath. The blue needed two coats, and so the tape was removed after each coat - just look at those lines :)
The client was delighted with the result, and I must say that I am too. A much brighter on trend addition to a little boys room. Another custom painted piece off to its rightful home. Inspiration for this piece was taken from a Pinterest board the client had been collating. She wanted it to go in her 3 year old sons room, not be to childish and for it to grow with him. We worked together to create a unique piece to be used for many years to come.
Geometric Cabinet Before
Geometric Cabinet After

Custom Furniture Painting - Geometric Cabinet
This cabinet has seen parts of the world that I haven't! It was shipped back to Ireland by a couple who had lived in Indonesia for a few years. This is a well made, solid and very heavy piece of furniture in a kind of cherrywood finish.
This one had me a bit stumped, it appeared to be a sort of laminate wood, but did not behave like one. With the first coat of undercoat there was a lot of bleed through - something that would never happen with a laminate. This would be an issue normally found with mahogany, teak and knotty pine - any dark stained or raw wood with a naturally dark finish. It is the oils in the wood that seeps through the finish causing a yellowing effect. Never fear, with furniture painting you can often run into surprises - experience makes you better equipped to spot a bleeder from a line-up, not this time! I had difficulty getting the undercoat to stick properly and so needed to spend a lot of time prepping this one. Fail to prepare, prepare to fail.
Once the bleed through had been sorted, it was time to do a base coat in white. I had been looking at the B&Q range of paints and wanted to give them a try so chose Antique White & a gorgeous soft teal in an eggshell finish for the geometric colour pops. I found this paint surprisingly easy to use, gave a lovely smooth finish and with its low price point of €13 per tin, it is an ideal paint for someone starting out with furniture painting and not looking to spend a fortune.
Another coat of white, a couple of days to cure, and the piece was ready for its bold new look. If planning to do this effect, it is important to let the piece fully cure from its base colour. Curing can take from a couple of days to a week, so it is important to check the manufacturers guidelines. If the paint is not fully cured beforehand, you risk pulling off your new paint job with the tape when creating geometric finishes such as these.
Using masking tape to create this effect, I lined marked out the areas to be painted blue. It is important to use a good quality one designed for this purpose. Sure, any old masking tape will do - wrong! To get precision lines and avoid ruining the piece you've worked so hard on, it is important to use a low tack tape such as Frogtape (available in all good hardwares such as Woodies) or Fleetwood do a brilliant Low Tack Washi Tape - available to buy on Shabby.ie . There is nothing more disheartening than finishing a piece, pulling off the tape and taking more paint with it! Always remove the tape immediately after painting and before the paint has dried - again this keeps the lines sharp and avoids pulling and damaging the paint underneath. The blue needed two coats, and so the tape was removed after each coat - just look at those lines :)
The client was delighted with the result, and I must say that I am too. A much brighter on trend addition to a little boys room. Another custom painted piece off to its rightful home. Inspiration for this piece was taken from a Pinterest board the client had been collating. She wanted it to go in her 3 year old sons room, not be to childish and for it to grow with him. We worked together to create a unique piece to be used for many years to come.
Geometric Cabinet Before

Geometric Cabinet After
